How to Choose an RC Body That Fits: Wheelbase, Width and Mounts
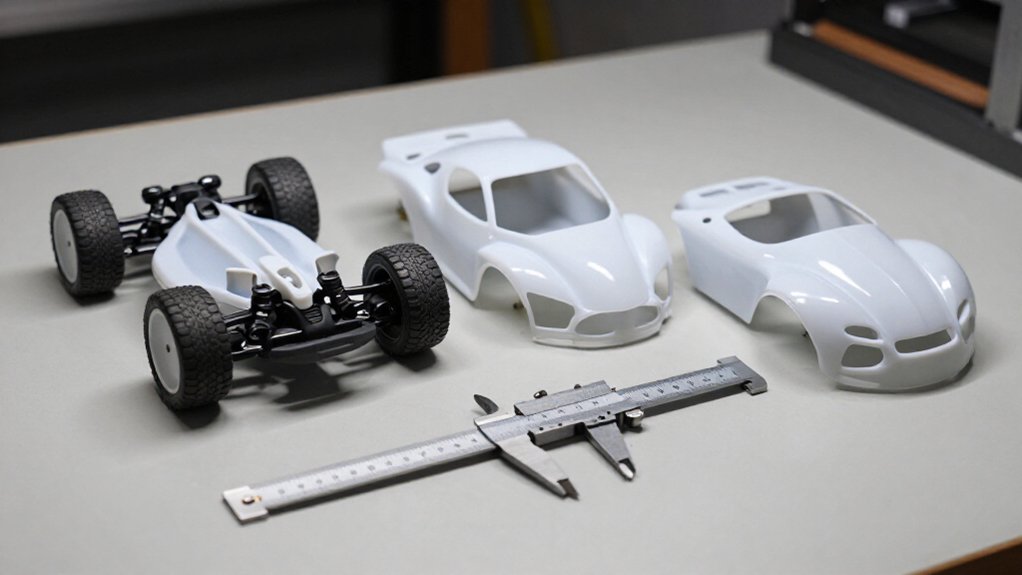
Match the body’s wheelbase and track width to your chassis, then verify front-to-rear and side-to-side body-post spacing; similar scale labels don’t guarantee fit.
Before drilling, position the shell, center its arches over the tires, and mark posts only after alignment. Check clearance at full steering lock and suspension travel, plus room for electronics.
Compare overhang and mirror locations, too. More checks cover material, class rules, paint costs, and details that carefully refine your final choice.
Match Body-Post Hole Spacing
Before choosing an RC body, measure the chassis’s front-to-rear and side-to-side body-post spacing, then compare those measurements with the shell’s specified hole layout.
You should verify both axes because matching wheelbase alone won’t guarantee that the holes align. Body-post patterns can differ between models even when they share the same scale, wheelbase, and width. Check the body’s marked dimensions or fitment specifications rather than relying on appearance or vehicle class.
Before drilling, place the shell over the chassis and mark each post position on its underside. Then confirm the shell sits level and centered, and verify every mark corresponds to its post. Don’t enlarge or relocate holes until you’ve checked whether compatible extended or adjustable body mounts can correct the mismatch without shell modification.
Check Tire Clearance
Once the body-post holes align, mount the shell and check that each tire sits centered in its wheel well. Confirm clearance at full steering lock and through suspension compression and extension; tires that touch the shell can slow your vehicle and damage the body. On off-road models, check travel carefully because suspension movement and larger tires can reduce clearance.
Compare each wheel well’s shape and measured opening with your actual tire diameter and width, rather than relying only on the body’s stated scale. If the fit is tight, mark the contact area and trim the opening gradually with curved scissors or a body reamer. Remove small amounts, then remount the shell and repeat the steering and suspension checks. Keep the edge smooth and clear.
Front and Rear Overhang
Front and Rear Overhang
Check how far the body extends ahead of the front axle and behind the rear axle, then compare both overhangs with those of the original shell. Matching wheelbase and width alone won’t guarantee correct fit; measure each end against the original shell. Excessive extension can make your build look unbalanced and expose body ends to impacts.
| Area | Fit check |
|---|---|
| Front | Measure axle-to-edge extension. |
| Rear | Compare with original shell. |
| Arches | Center over tires. |
| Movement | Confirm end clearance. |
Position the shell on the chassis and inspect both ends through suspension movement. Verify that neither end contacts tires or chassis as the suspension compresses and rebounds. Only after confirming clearance and arch alignment should you trim or drill; otherwise, mounting changes may lock in a poor fit.
Polycarbonate Versus ABS
When choosing a body, compare polycarbonate’s low weight and flexibility with ABS’s rigidity and sharper molded detail. Polycarbonate typically flexes through impacts, while heavier ABS can crack or splinter in a hard tumble. Match the material to your priorities: impact resistance and speed, or scale detail and added weight that may benefit a crawler.
Polycarbonate Flexibility and Weight
Polycarbonate (Lexan) RC bodies are typically 0.5 to 1 mm thick, keeping them light while allowing them to flex under impact. It can deform during a collision, spreading impact loads across the shell rather than concentrating stress at one point. That give can help your body resist shattering during racing contact, jumps, and hard bashing; it won’t make the shell indestructible, so inspect it for tears around body-post holes and wheel openings.
Its low mass also limits the weight your motor must accelerate, helping preserve responsiveness and speed. If you prioritize durability with minimal added weight, polycarbonate is usually the practical choice. ABS adds mass, which may reduce speed, although that weight can help you tune crawler balance. Choose according to how you drive: polycarbonate suits repeated impacts and performance, while ABS suits scale detail. Match the shell’s wheelbase, width, and mount locations before installation.
ABS Strength and Rigidity
Because ABS is more rigid than polycarbonate, it holds molded details such as grilles and door handles, making it a strong choice for scale builds.
That stiffness helps panels retain crisp contours, but it also limits how much the body can flex around the chassis. You’ll notice the difference when fitting the shell over posts or aligning edges: ABS keeps its shape, while a polycarbonate shell gives more under pressure. ABS also weighs more, which can reduce your model’s speed; on a crawler, that extra mass may lower the center of gravity.
Its exterior paint sits on the visible surface, so handle the finish carefully during setup. Choose ABS when molded scale detail and a firm body matter most; choose polycarbonate when you prioritize lower weight.
Durability and Impact Resistance
That stiffness also affects impact behavior: a polycarbonate (Lexan) shell can flex during a crash and absorb repeated hits, while a heavier ABS body is more likely to crack or splinter under a hard impact.
Standard Lexan shells measure 0.5 to 1 mm thick, so inspect the shell after impacts for splits around body posts, wheel arches, and cutouts, where stress concentrates. Heavy-duty, thicker versions resist damage better, but their added mass can change handling and increase load on mounts. With repeated racing or bashing impacts, Lexan’s combination of low weight and flex helps it deform and recover rather than fracture. ABS holds grille and door-handle detail, yet its rigidity leaves less tolerance for tumbles; inspect for hairline cracks and don’t force damaged panels into shape.
Choosing the Right Material
Which material suits your driving style depends on the trade-off between impact resistance and molded detail. Polycarbonate shells are lightweight, flexible, and impact-resistant, so you can choose them for racing, bashing, or rough driving. At roughly 0.5 to 1 mm thick, they flex under impact instead of shattering.
Paint a clear shell inside with Lexan-specific paint; this placement helps protect its finish from scuffs. ABS or PS hard-plastic bodies preserve finer molded features, including grilles and door handles. However, they’re heavier and can crack or splinter during a hard tumble.
Their exterior paint may also scratch as you drive. Choose hard plastic when you want crisp scale detail, or when added body weight helps your crawler maintain traction and stability. For impact-heavy use, polycarbonate usually offers the more forgiving shell. Match the material to your vehicle’s purpose, expected impacts, and preferred appearance.
Scale Crawling or Oval Racing
For scale crawling, match the body’s wheelbase and width to your chassis, then confirm the wheel wells clear the tires through full suspension travel. Position the shell before drilling so you can align the wheels and mark the mount locations accurately. For oval racing, choose a class-approved body whose shape covers the wheels and whose dimensions and mounts fit your chassis.
Crawling Body Clearance
How much clearance does a crawling body need? For scale crawling, check each wheel well against its tire through the suspension’s full travel. This prevents the shell from rubbing or snagging on obstacles. Compare wheel-well shape and opening size with your tire diameter; larger tires and increased suspension travel require more room.
Compress and articulate the suspension while checking, not only at ride height. Inspect clearance from the body to chassis components too: a matching wheelbase won’t prevent interference with moving parts. If a tire catches, use curved body scissors to trim the wheel opening. Remove small amounts, then recheck full travel; don’t cut away excess material. Before drilling post holes, test-fit the shell and mark positions so it sits correctly without reducing tire clearance.
Crawler Mount Placement
Once the wheel arches clear the tires through suspension travel, position the crawler body with each arch centered over its axle. Measure from the front axle center to the rear axle center, then compare that wheelbase with the body’s listed dimensions. Similar wheelbases don’t guarantee matching post locations, even on 1/10-scale models.
Set the shell on the chassis, align it, and mark each post hole before drilling. Use molded dimples or marked mounting points when available, but verify their alignment rather than assuming they match your chassis.
Before securing the shell, check clearance between it, the chassis, and tires at full steering lock and suspension compression. If a tire rubs or snags an arch, trim the opening carefully, then repeat the checks. Tighten mounts only after the body sits securely without restricting steering or suspension movement under load.
Oval Body Shape
Although an oval body can suit scale crawling or oval racing, its shape and “1/10 scale” label don’t guarantee fit.
For crawling, match the body’s wheelbase and width to your chassis; scale labeling alone says nothing about exact dimensions. Check that each wheel well aligns with its tire and leaves room for steering and suspension travel.
For oval racing, verify the shell’s dimensions and mounting points against your specific chassis, because oval bodies aren’t universally interchangeable. Before drilling, set the shell on the chassis and center it over the wheels. Mark each body-post location only after confirming alignment from above and both sides. Then check tire clearance at full steering lock and full suspension compression. This test helps prevent rubbing that could damage the body or hinder driving. Recheck the fit after mounting, since post placement can shift the shell before your first run.
Racing Wheel Coverage
For oval racing, the body’s wheel openings should cover the tires without rubbing through steering or suspension travel; on a scale crawler, they should preserve realistic proportions while leaving room for articulation over obstacles.
Match wheelbase and track width to your chassis, then compare wheel-well position and width with the mounted tires. Check the shell at ride height and through full steering and suspension travel; tire clearance can change as the wheels turn or the suspension compresses. On a crawler, allow enough opening for the axle to articulate without making the tires look undersized or the body appear lifted.
Trim gradually with curved scissors, removing small amounts and checking clearance often. Don’t cut to a static tire position alone. Before drilling body-post holes, mock up the shell and verify wheel alignment and clearance at ride height and full travel. Adjust the shell’s position first, so your openings remain centered and you don’t remove more material than needed.
Battery and Electronics Clearance
Check that the body clears the battery, motor, ESC, and receiver without pressing against or obstructing them. Compare the shell’s interior shape and height with your installed electronics, especially if your battery or wiring sits higher than stock. Allow space for wires and connectors so mounting the body won’t pinch them or let the shell flex against them while driving.
If the body needs a different mounting height, verify that extended mounts provide clearance without leaving the shell loose. Then secure the body with its clips or fasteners and recheck every gap. A shell that sits clear over the chassis when loose may contact electronics once mounted. Check clearance around components and wiring throughout the chassis, not just at the center of the shell.
Paint and Decal Expenses
A clear polycarbonate body usually costs less upfront than a pre-painted shell, but you’ll need to budget for flexible, polycarbonate-safe paint, masking materials, and decals. Paint clear shells on the inside with paint formulated for polycarbonate; ordinary paint may not adhere reliably and can damage the shell. Masking and layering colors takes time, and complex designs can consume extra paint. A black, white, or silver backing coat can improve color contrast and coverage.
Pre-painted bodies cost more than unfinished shells, but you avoid buying paint and spending time planning and applying a design. Decal prices vary with quantity and artwork, so check the package contents before purchase; some bodies include decals, while others require a separate purchase. Add it to your full build budget.
Inspect Fender Arch Shape
Compare the body’s fender-arch shape and position with your tires to prevent rubbing or snagging. Static fit isn’t enough; check clearance as suspension moves, especially if you drive off-road. Wider tires need adequate arch width, while larger-diameter tires need sufficient height. Inspect both dimensions before choosing a shell.
- Match each arch’s curve to the tire profile; mismatched contours can catch during steering or compression.
- Check clearance at full suspension travel, including compression and articulation.
- If needed, use curved body scissors for clean trimming; a body reamer suits small adjustments.
- After trimming, test the body through the suspension’s full range of motion and confirm the tires clear every arch.
Trim gradually and recheck often; removing too much material can weaken the edge and spoil fit.
Confirm Mirror Placement
Before drilling, verify that the molded mirror locations align with the vehicle’s sides and body posts. Turn the steering through its full range and compress the suspension to expose potential contact points. For close-fitting shells, compare each mirror with the body width and wheel-well alignment.
- Confirm each mirror clears tires, suspension arms, and chassis during movement.
- Check that mirrors won’t block clips, magnets, or other mounting hardware.
- Mark separate mirror positions on the shell, but leave them unattached.
- Refit the body and inspect clearance from both sides before fastening.
If a mirror touches any component, adjust its position or choose a compatible body. Recheck fit with the shell seated at its intended height; static clearance alone won’t reveal interference under steering or suspension travel.
Conclusion
Before you buy, compare the shell’s wheelbase, overall width, and body-post spacing with your chassis; small mismatches can spoil fit. Check tire clearance at full steering and suspension travel, plus front and rear overhang. Confirm fender arches, mirror placement, and room for your battery and electronics. Choose polycarbonate or ABS for your driving style, whether crawling or oval racing, and budget for paint and decals. A fit check means you’ll save time and prevent costly modifications.