
DIY Indoor RC Crawler Course Ideas Using Household Items
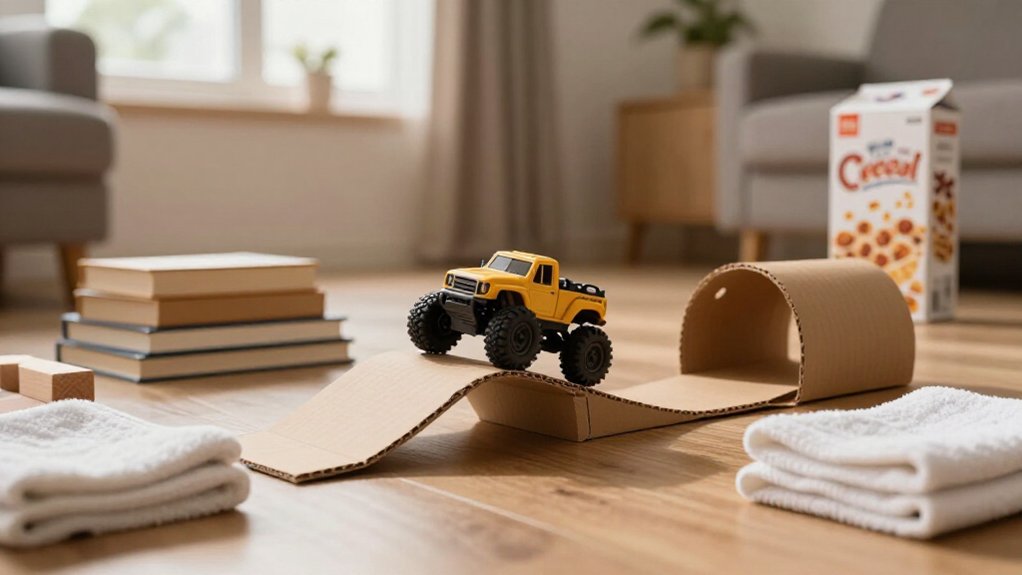
Build a compact indoor crawler course on plywood, cardboard, or firm carpet. Use books and boxes to prop shallow cardboard ramps, then raise the angle gradually.
Fold a terry towel beneath itself for rounded ridges and dips, securing edges with tape.
Arrange paperback books as low steps, and guide your crawler between straw gates spaced about one crawler-width apart.
Keep turns stable, clear loose gravel, and test each change slowly. Next, discover more ways to tailor your course.
Indoor Household-Item Course Surfaces
Books, boxes, and planks make easy indoor hills: stack them to create uphill and downhill runs, then adjust the height and angle to suit your crawler. To build a side slope, prop one edge on a stable triangular support. A partially open book gives you a quick ramp; secure its pages and test the incline with a slow crawl.
For rock-like terrain, screw broken packing Styrofoam onto a board, or shape dried expanding foam into jagged ridges. Keep the pieces firmly attached before driving over them.
Fill a shallow container with cork, gravel, bark, sand, or foam scraps for loose terrain. For temporary texture, press newspaper paper-mâché onto cardboard, arrange dried pasta in ridges, or flip food containers into bumps along the route indoors.
Cardboard Ramp Tradeoffs
A large cardboard box or a few layered sheets can become a budget-friendly ramp for your micro crawler, and you can reshape them with scissors to change the route. Prop it against books or a box, then begin with a shallow slope. Test your crawler’s climbing control and raise the angle only when it stays steady.
Cardboard cuts easily, but repeated runs can bend or collapse it; fold supports beneath the deck or add layers. Smooth faces offer little grip, so any added texture must lie flat and stay secured, away from loose edges that could snag tires. Drive carefully.
| Setup | Benefit | Watch-out |
|---|---|---|
| Shallow slope | Safer test | Increase gradually |
| Folded supports | Resists bending | Check stability |
| Extra layers | Stiffens deck | Adds weight |
Textured Towel Trail
Choose a textured bath towel and lay it flat on the floor or plywood, securing it so your crawler won’t pull it out of place. Fold sections into low ridges, then tuck books or boxes underneath to create gentle climbs and descents. Start with a wide, easy route, then sharpen the folds and narrow the turns as your driving improves.
Choose a Textured Towel
For a simple textured towel trail, spread terry cloth or another raised-weave towel flat on a firm surface so it won’t bunch under the tires. Choose a towel with a visibly uneven pile; terry cloth gives your micro crawler small bumps and grooves without bulky obstacles. Run your fingers across the fabric to confirm its loops stand proud rather than lying smooth. Secure the edges with painter’s tape outside the driving line, and check that the tires grip the weave instead of skating.
Once traction feels reliable, add a gentle towel-covered incline for a modest climbing test. Keep it shallow, since a slick or steep slope can turn a fun crawl into a slide. Raise the challenge only after your tires hold securely. Try a low-speed run, watching whether fabric shifts or bunches; adjust edge anchors before sending your crawler up the slope again for another test.
Create Trail Sections
Once the towel’s edges are secure, fold or bunch a few sections into low ridges to create a quick trail of bumps and changing grip. Lay a textured bath towel or small rug flat, then tape its edges down or set it on plywood so the fabric won’t bunch beneath your tires.
Use books or small containers as markers to outline a narrow, winding route across the towel. Keep the first folds shallow, leaving room for your crawler to crawl without snagging its chassis. Drive slowly over each ridge and notice how the tires grip while the suspension responds to the soft, uneven surface. Adjust the spacing between folds or markers to make the route more technical, and reset the towel whenever it shifts.
Add Gentle Elevation
Build on the towel trail by adding gentle elevation that lets your micro crawler practise climbing without tackling abrupt steps. Lay a textured bath or hand towel across a flat board, then smooth it into a broad, nearly level route. Roll or fold small sections beneath the fabric to form low ridges your crawler can climb gradually.
Keep each rise soft and rounded; sharp creases can turn an easy ascent into a sudden obstacle. Add a shallow dip or a gentle sideways slope for variety, checking that the towel stays stable under the tires. Start wide and nearly flat, then slowly raise or narrow one section at a time. Watch how your crawler responds, and adjust the folds to practise throttle control and balance.
Secure the Towel
A bath towel makes a simple textured trail that tests your micro crawler’s traction and suspension. Lay the towel flat over plywood or cardboard, keeping the fabric spread smooth beneath the tires. Secure every edge with tape or clips so the cloth won’t bunch, wrinkle into a snag, or slide as your crawler climbs. Press the corners down, then run your hand across the route to find loose spots.
Keep the trail clear of loose objects that could catch a tire or block a wheel. Check each fastener before driving: tape should lie flat, and clips must stay outside the crawler’s path. Start with the towel stretched smooth and guide your vehicle across its weave. If an edge lifts, stop and secure it again.
Adjust Trail Difficulty
Start with the textured towel spread flat on the floor, then add folds as your crawler grows more confident. A towel makes a quick indoor trail, and its changing surface gives your crawler a manageable route to navigate. Fold one edge into a low ridge, or bunch a section gently to form shallow dips and uneven ground. Increase the folds gradually only after your vehicle handles each simpler layout with confidence.
For a short climb, set a small book or block on the towel, leaving room around it for a clear approach and exit. Keep the towel secured, and tuck away loose edges so they won’t bunch unpredictably beneath the crawler. Change one section at a time to shape a route for your skill.
Test Wheel Traction
How well do your crawler’s tires grip different fabrics? Lay a textured bath towel or folded hand towel across the floor to build a quick traction trail.
Compare raised loops with ribbed bands; you’ll feel each surface challenge the tires differently. Add gentle folds or wrinkles so your wheels climb small ridges, but keep the towel flat enough to stay stable.
For another test, lightly dampen one section and run the crawler over both dry and mildly damp fabric. Keep moisture away from your crawler’s electronics, and never soak the towel.
Finally, angle the trail uphill or across a slight sideways slope. You’ll test grip as weight shifts and steering changes. Go slowly, watch for wheel spin, then adjust your approach or tire setup.
Best Surface for Tight Turns
For crisp tight turns, choose smooth carpet or a firm base like plywood or pond liner, where your tires won’t sink or snag. Balance grip and texture with just a thin, secured layer of sand, and keep loose gravel out of corners. Give each gate about one crawler-width of clearance so you can practice precise steering without sacrificing traction.
Smooth Carpet Options
A patch of smooth, low-pile carpet gives your 1/24-scale crawler a predictable surface for tight turns without snagging its tires.
Clear the area beside a couch or workstation, then lay down a compact course. Use drinking straws, small cones, or other lightweight markers to outline narrow bends. Space them about one crawler-width apart; this lane will make every steering correction count.
Add book steps or a short plank ramp nearby to vary the route, but secure each obstacle so it won’t shift as you turn. Keep loose sand, gravel, and pea gravel off the carpeted turning section. The smoother pile lets your small rig follow a more predictable line, so you can focus on placing its tires between the markers rather than fighting snags.
Hard Flooring Grip
Hard flooring gives your micro crawler a firm, predictable base for precise tight turns, without the tire sink or snag you might encounter on softer surfaces. Claim a corner beside your workstation or couch; clear space for a compact loop. Set drinking straws, painted rocks, or cones as gates, spacing markers about one crawler-width apart.
Approach slowly, steer through each bend, and straighten before the next gate. Lay books or boxes on the floor for small slopes, but keep approach and turning zones on stable flooring. Contain sand or pea gravel in a tray; scattered pieces can reduce grip on smooth flooring.
Reset markers between runs and narrow the gates as your steering improves. Use the open corner to practice repeatable entries, exits, and controlled low-speed corrections often.
Surface Texture Balance
When tight turns matter, choose a firm base with enough texture to grip without making the crawler’s path unpredictable.
Build a test surface from pond liner, then coat it with stone-colored plastic paint. Apply medium-weight spray adhesive, scatter play sand, and add another adhesive coat to lock the grains in place. This finish supports precise steering.
Compare quick indoor runs first on smooth cardboard or plywood and on sand, cork, bark, or small gravel. You’ll notice how each texture changes your control. Keep loose pea gravel inside contained zones; shifting pieces can make a tight line difficult to repeat.
Start with a wide, firm turning area. Then add rougher patches or narrow passages gradually for a precision challenge.
Turn Clearance and Traction
For tight turns, give your crawler a firm, stable base, such as a plywood plank or 44 × 44-inch board, and secure obstacles with hot glue so they won’t shift under its tires. Keep pea gravel, sand, cork, or bark shallow around bends: loose layers can steal traction, trigger wheelspin, and crowd your chassis.
Leave rocks and steps roughly 3.5 to 4 inches apart for an SCX24, giving its tires room to pivot without scraping the body or chassis. Test corners with low, gradual bumps made from books, boxes, or foam before raising obstacles; taller edges may catch the chassis.
Begin with a generous turning lane, then narrow it step by step. Set gates about one crawler-width apart to test precision without forcing unwanted tire contact with markers.
Choosing for Available Floor Space
Start with the space you have, whether it’s a tight corner beside the couch or a clear stretch of floor. Use a compact 44-by-44-inch layout if you’re working in a corner; one pond-liner course used that footprint.
A plywood plank gives you a portable base you can size to the area, and an eight-foot length can hold several practice obstacles. Choose books, boxes, or small containers to build slopes and terrain pits without claiming a permanent patch of floor.
Keep enough room for your crawler to turn and pass through gates; space them about one crawler-width apart. Build the course in sections, or make obstacles movable, so you can reshape the route when space shrinks. Test each arrangement before adding another turn or obstacle.
Household Item Cleanup Tips
After reshaping your course, clear away grit before it spreads through the room. Shake loose sand, gravel, and foam scraps from course pieces into a bin before you store them. Then vacuum or sweep stray play sand and debris from the floor after each session; this keeps grit from hitching a ride across your home.
Wipe reusable obstacles, such as plastic containers and pipes, with a damp cloth before returning them to storage. If you’ve used plaster, paint, or adhesive, let it dry fully before you handle or store those materials.
Finally, sort small pieces—gates, rocks, and bridge parts—into labeled containers. Labels make setup easier next time and help keep tiny course treasures from disappearing into a cluttered box. Keep the bin close while dismantling, and check floor edges for overlooked crumbs before you finish.
Furniture-Leg Clearance Challenges
Turn a sturdy table or chair into a tight slalom by weaving your micro crawler around its legs. Place drinking straws, cones, or painted rocks beside the legs, spacing each marker about one crawler-width apart. These narrow gates demand careful steering and reward small, smooth inputs. Before driving, check that the furniture won’t wobble; leave open space nearby so you can retrieve the crawler if it gets stuck.
For a clearance test, guide it beneath a low, stable shelf or crossbar. Watch the roof and body as they pass under; raise or remove the obstacle if anything scrapes. Add a nearby plank for precise turns and uphill or downhill slopes. Adjust gate spacing to match your skill, then tighten it for a tougher run.
Paperback Book Staircase
Paperback Book Staircase
For a compact climbing challenge, stack paperback books into a low staircase for your micro crawler. Start with short rises, then add books or increase each step’s height as your driving improves.
Slightly offset the covers to create irregular edges that challenge tire placement and let the suspension articulate. Keep the route wide enough for your crawler, and secure the stack so nothing slides mid-run.
- Approach from the shallow end; use gentle throttle as your front tires meet each book edge.
- Try different angles to practice precise steering and keep both front wheels planted.
- Add a paperback or raise each step gradually when the climb feels easy; change one thing.
- Secure any shifted books, then carefully compare your crawler’s control across the uneven staircase.
Conclusion
Start with the space and household items you have, then build a course that challenges your crawler without risking your furniture. Use cardboard for adjustable ramps, towels for grip, and paperback books for stair-step climbs; test each feature slowly. Keep turns wide enough for your model, check leg clearance, and move fragile objects out of reach.
When you’re done, fold, stack, or store everything. Your best indoor trail is the one you’ll enjoy rebuilding.